By adding animation to our button, we can make it seem as though it "comes to life," like Frankenstein's monster, when the user rolls the mouse over it. To do this, you need to create a Movie Clip symbol.
Create a new layer named alive in the Fancy Button symbol and
insert a keyframe in the Over column. Next, draw the first frame of
your animation directly in this symbol. For this animation, let's start with something simple: Just draw a small dot in the upper-left-hand corner of the box.
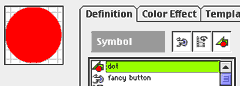
Convert this dot into a separate symbol by selecting Insert:Create Symbol
and naming it "moving dot." This new symbol is now an ingredient of the Fancy
Button symbol. Next, make Moving Dot the active symbol. To be able to make the dot "move," we need to create an additional Dot symbol, nested within the Moving Dot symbol we just created. So select the dot and create a second symbol named Dot, which right now should be identical to Moving Dot.
 All this symbol nesting can be pretty confusing, especially since Flash
3 doesn't clearly indicate the relationship between symbols. But if you ever want
to know the source of a symbol within another symbol, double-click the symbol
to reveal the Instance Properties, and its relationships with other symbols will be highlighted under the Definition menu.
All this symbol nesting can be pretty confusing, especially since Flash
3 doesn't clearly indicate the relationship between symbols. But if you ever want
to know the source of a symbol within another symbol, double-click the symbol
to reveal the Instance Properties, and its relationships with other symbols will be highlighted under the Definition menu.
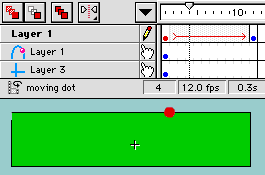
Now, back to our dot. Be sure that you're still working in the Moving Dot symbol (you can switch the active symbol from the pulldown menu just below the layer names). You're going to make the dot move in a pattern that follows the edge of the rectangular button. To do this, click on the icon to the right of the layer name and select Add Motion Guide from the popup menu. With the Library tool palette open (Window:Library), select the Rectangle symbol and drag its picture into the stage, aligning the top-left corner with the dot.
Using that rectangle as a guide, you can now create the path for the dots. With the rectangle selected on the stage, choose Modify:Break Apart. This will allow you to outline the rectangle using the ink bottle tool  . After creating the outline, delete the interior rectangle. You should now be left with a rectangular-shaped path for your dot to follow.
To help with alignment, create a third layer and define it as a guide layer
under that layer's popup menu. Go to the Fancy Button symbol and
copy the rectangle from the Over frame. Return to the Moving Dot symbol and
select Edit:Paste in Place, and the rectangle you just copied will be pasted
in the exact same position it is in the Fancy Button symbol. Since you created
this as a guide layer, you'll be able to see the rectangle while you're working, but it won't actually export
in the Shockwave movie. Lock this layer so that you won't inadvertently move
the guide.

 Next, select just the left edge of the rectangle outline and click on the Scale tool. Drag the top handle to just below the dot, so that the path is not closed. The dot should be aligned with one end of the path. To help align the dot, you can select View:Snap (if it isn't already selected). This will create a magnetic connection to the motion guide while you move the dot.
Next, select a dozen or more frames of all layers and choose Insert:Frame. Then, insert a keyframe as the last frame on the layer with the dot. Move the dot in that keyframe to the opposite end of the path. Then add a motion tween between the keyframes in that layer. Hit the Enter key so that you can preview the motion of the dot around the path. Adjust the position of the dot and motion guide relative to the rectangle, if necessary.
next page»